Posts

Showing posts with the label Gaming Art

Gaming Art | Final thoughts and changes in development along the way

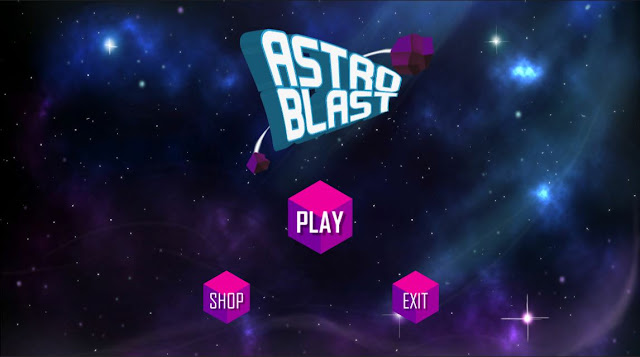
I am pretty happy with my game and it was a lot of fun. Specially because we had a lot of freedom regarding idea, development, design... etc, which wasn't the case the last time I built a game for an assignment. So what is different to the initial proposal? I left the black holes out. I tried creating them first with particles (I found a great tutorial for it but it was for Unity 2018) and I couldn't quite figure out how to model and animate it to make it low poly and good looking with the rest of the game. And the level is pretty long anyway, so I think it's best. Also I got rid of the Shop (for the moment) because I don't know how to save the points between scenes so that the player can use them to purchase better weapons or assets. Is the same problem with my character's name . I wanted the player to name it, but the name wouldn't be saved for the level scene, only the Main Menu. After some people played my game and I got some feedback I changed t...

Gaming Art | Sound

Image
The final step was adding sound to the game. I found a very good video that implements an Audio Manager which controls almost all sounds with just one object and it is very handy. [ Video here ]. This way I didn't need to create an Audio source or Audio clips as components or variables everywhere. For the rest of sounds that don't need coding, aka the are played on awake when they're instantiated like the laser shots,  I added an Audio Source like normal. I specially love the "Game over" sound and the "Level completed" sound ;) I had a problem at some point when I wanted to play a clip inside the Update(), because it would restart playing over and over again, like stuck. These were mainly for sounds that I wanted to appear with Panels, so at the end I added an Audio Source to the Panel and it works fine. This part was a lot of fun! Sound definitely makes the gaming experience better. Useful links (where I found the music and SFX): Soundim...

Gaming Art | Final boss + Fireworks!

Image
For the boss fight I wanted the boss to enter the screen, stop going towards the player, make the intro animation and then start the fighting. Well this was a ride. After entering the screen she collides with an area that should make her stop and only move up and down but it wasn't working at all. After much testing, I added two different scripts, one to the Empty object parent that moves towards the player and the other one with all the boss coding. And it worked! All the animations too, the animator looks like this: Then the boss starts shooting. I made the laser way bigger and bright red, I linked a tutorial at the end of the post. Also I added a Slider as the boss' health that decreases when it gets hit. I made the boss pretty easy (health 10 and damage is -1, so you only have to hit her 10 times). Also during the boss fight oxygen cans are being spawned every 5 seconds just in case the player needs oxygen to not die! When the boss is defeated it spawns a lo...

Gaming Art | Creating the HUD: Lives, Oxygen bar + Main Menu + Game Over panel

Image
The main menu looks like this: I haven't implemented the shop yet, and I hope I have enough time to do it! The HUD has three lives, an oxygen bar that decreases gradually and points you can earn by collecting astronaut food.  I had some problems with the bar at first because I had declared two floats in the same line like this: public float currentOx, maxOx = 100; and I thought you can initialize both variables at the same time with the same value, but no, you have to assign a value to both of them independently. And finally I implemented a Game Over panel with two buttons to Try Again or to Exit the game to the Main Menu. This just appears if the player dies. Also the objects stop moving to the left  in the background and the user can't move the player anymore. Useful links: Player Health UI   Player Health System Health bar

Gaming Art | Collectables + Coordinates problem in Unity

Image
I had to create the collectables from scratch because I cannot find the Maya file where I put them. But they're very easy so it didn't took that long. The texture of the astronaut food and the label of the oxygen can I made in Photoshop with the UV Map export.  I also made an Idle animation. But it doesn't work in Unity and I don't know why. It looks like the coordinates have been wrongly imported to Unity (?) because the Z and X axis are switched. Also, when I load the idle animation, exactly like I did with every other element, when I press play the objects are placed in the origin, it doesn;t matter if I placed them somewhere else or if they have code attached. 

Gaming Art - Week 14 | Building in hazards + Comet animation

Image
This week I added asteroid waves and a comet. I made this idle animation for the comet: While the player, background and camera are static, all the hazards come towards the player with a simple line of code. I also implemented a Sine and Cosine movement I learned from this tutorial . Then I added asteroids that move up and down, but with the movement along the Z-Axis the movement is more diagonal, but it still works. I had some problems with the code but I posted my question in Stack Overflow. It's a forum where people post questions about coding (it can be anything IT related really) and someone helped me out and now it's working fine! Useful links: Sinusodial movement in Unity   Lerp function

Gaming Art - Week 12 | Particle systems

Image
I added emissions to the astronaut and comet to recreate fire. I was inspired by this tutorial [ Low Poly fire particle system ] to make it look low poly so the style stays consistent.

Gaming Art - Week 11 | Slowly putting the game together in Unity + First problems

Image
Well, my goal for this week was way more than I actually achieved because when I imported the astronaut, the materials and lighting looked very bad and weird. I did not know exactly why. I changed the hard edges, the shading, the material attributes, I changed options and attributes in Unity and made lots and lots of tests, as you can see in the fotos below. It was very frustrating. But in the end I manage to fix it to a decent result (the last astronaut on the right). So what I did in Maya: I applied soft edges in a 40 degree angle ( Mesh display > Soften/Harden edges ), I activated the Smooth shading and deleted the non-deformer history . And this seemed to work. I also added a particle system to make it seem like the astronaut is being propelled, I still have to play a bit more around with that. Useful links: -  Changing camera projection to ortho  -  Particle Systems

Gaming Art - Week 10 | Animations

Image
These are the animations I made for the characters so far. I typed down the frames so that I know where to cut the loop in Unity.  1-20 Shoot 30-55 Hit 55 - 155 Dead 160-190 Idle Ufo rotating Queen of the ufos opening scene (spikes)

Gaming Art - Break | Rigging the astronaut

Image
The next step was rigging the astronaut. I'm gonna include a short explanation of how to rig a character because I didn't last semester and I forgot how it was, so here it is so I can look back into it in case I forget again: Before starting, make sure that the model is finished and that the history of every element is deleted .  Click on the Character Controls (the little man on the right) > Character and Source are None > Create Skeleton . Then adapt the number of fingers or spine bones and move them (press D to move a single bone instead of the hierarchy) to fit the character.  Once it's done, I like to group all the elements of the character. Select the group and the skeleton, go to the Rigging menu > Skin > Bind skin (click on the little box) > Set the influences to 3. This last step does not always work for some reason. I tried it a bunch of times and then one time suddenly it worked. Make sure that the options in the skeleton are ...

Gaming Art - Week 9 | Finished astronaut + Materials

Image
I put some materials on the finished astronaut to see how it would look like in Unity. The Arnold renderer is not trangerible to Unity, I'll have to create my own materials on Unity or download a package of the Unity Store, but I wanted to have an idea. And here are some renders. I set up the samples very high and the image is still very noisy, I do not know exactly why. And here's a render after changing the bracelet's design! I think it looks more cohesive this way, since they look like the knee pads. I also hardened the edges of the model to make it look more Low Poly ( Mesh Display > Harden Edge )

Gaming Art - Week 8 | Modelling the astronaut and backpack + Animations list

Image
We're gonna have to make animation trees in Unity once we start building in the assets and characters and everything, so I made a small list of the things I think I may need to animate soon. Astronaut's animations: hit dead shoot movement Enemies' animations rotate Boss: lights to spikes Also I kept modeling stuff! The astronaut's backpack and the astronaut. I really like how the backpack turned out.  Then I made a quick comparison of the astronaut's head in 3 mode and I did not dislike it at first, so I was unsure of how to leave it. But I sent both models to Unity to compare them in the Unity render with the Unity's lighting and the first one looks better, since it's more consistent with the low poly style.

BSA228 - Week 7 | Building assets: hazards, enemies and collectables + Building the astronaut

Image
This week I started building assets and started the astronaut. ASSETS The asteroids were really easy to make. I started with a sphere and decreased a looot the subdivisions until it was almost a cube and then I just pulled vertices and edges here and there, very randomly. For the enemies I started with a cylinder and decreased the subdivisions as well. For the lights and spikes I used Duplicate Special , so handy! Then I made a low poly crown (sorta) for the Queen of the aliens. For the comet I started with a sphere and cubes where I pulled one corner back . Then I duplicated it a lot of times until I got this. I'm posting it in 3 mode as well because it looks pretty funny. ASTRONAUT So even though everything is low poly the astronaut took a little bit longer and I did not really know how to go because I was thinking how the topology is going to affect the rigging afterwards because is so low poly. But I'll see in the next class when I get ...

Gaming Art - Week 7 | Mudbox + LOD in Maya and Unity

Image
MUDBOX The first thing is import the the objects in Maya, in this case a low poly bridge. Delete the history and attributes and send it to Mudbox ( File > Send to Mudbox > Send as new scene ). Under the Select/Move Tools Tab click on the Scale tool and scale it 10x10x10, because the scale is different between Mudbox and Maya. Increase the Subdivision levels up to 5 with Shift+D . Create a new sculpt layer. Now we can start carving. Select the sculpt tool and some stamp, increase the Strength to 100 and make the size pretty small. Activate Invert Function and start carving the stones. After that I added a granulated texture with a very big brush and weak strength. Then import a rock texture for the stones and set it as a stencil or stamp. Under the Paint Tools tab select the Projection and start painting. Oh, and do this in a new diffuse Paint Layer . In a new Specular Paint Layer paint with the Paint Brush black where it is not shiny and whit...