Posts

Showing posts with the label Compositing & VFX

BSA227 | Final thoughts + My experience as director

Image
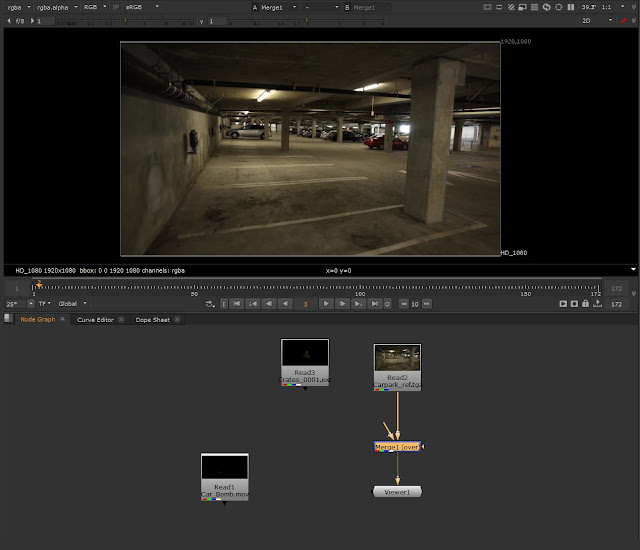
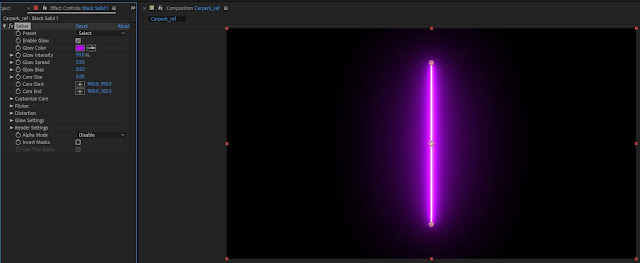
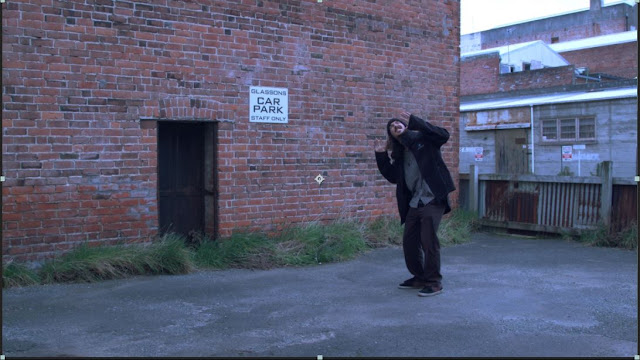
I am very happy with the final result, I think we all did a very good job and Rebekka's editing put everything together really nicely. There are still some details that we would have wanted to change and improve, like the lighting changes and I had a lot of problems with the transmission and the shadow intensity, because even if I adapted the shadow colour in Maya, it would appear very black and dark in After Effects. I was assigned as the director since the beginning of the project and I really liked that everyone was open to criticism and was willing to correct or change stuff if needed. Then the only thing I had to do is give the "ok, this is cool, looks nice", so it was pretty easy. Also I tried to organize everything the best and most practical way, so I created a document in Google Drive for post production  notes where everyone had access.

BSA227 | Sound

SFX I borrowed the Zoom and went to the park to record some ambient tracks and sound effects. I thought it would be tricky to record them alone but it went pretty okay. It was very windy though, so the sounds didn't turn out perfect. I recorded several types of steps (on grass, on dirt, on ground, on leaves...) and SFX for the falling apple and kicking can. Sometimes I had to stop and wait because of the train coming behind the park. For othe SFX like the spaceship and the scanner, Glenn found some good sounds. SOUNDTRACK I wanted something cheerful but not too upbeat, even a bit calm and sweet but not boring or romantic. I really like this website ( www.soundimage.org ) for ambience or background musics, since is royalty free (as long as we credit the creator, but we did in the credits). But in the end we chose some acoustic guitar tracks from the SIT Music Library. And for the "saving seed" moment I found a cool "hero" music which fits good and...

BSA227 | Rendering problems

Image
WATERMARKS (yes, again) In the first renders I got some watermarks back in 2-3 frames and when I rendered them again I always got watermarks back. So I rendered those frames with Batch Render and then it was fine, but it was a bit annoying. Luckily it only happened with that scene. TRANSPARENCY ISSUE Apparently you can't render the Transmission (for the glass helmet) so that you can see any background through the glass. You only see the reflection (which saves it a little bit) but the rest looks black, sometimes even matte. I played around a lot but I don't think it's doable unless you have the actual footage in Maya and put a Shadow Matte floor behind the glass which renders whatever background the scene has. But I couldn't load any footage in Maya, I always had to take screenshots and use the, as a background. So for some scenes I changed the Transmission under Visibility of the HDR Skydome so that is not completely dark. The problem is, some scen...

BSA227 | How to only render the character (Alpha channel)

Image
First set the Camera under Visibility in the Skydome (HDR) attributes to 0. If there are shadows that need to be render, create a surface which will cast the shadows and add a Shadow Matte material. This will only render the shadows. Then when everything is done and ready to render, make sure to delete the Camera plane so it does not appear in the final render.

BSA227 - Week 13 | Rigging Arl + Tips I've learned

The rigging was a bit tricky and I had to do it a couple of times from scratch. After creating the skeleton I rigged everything and the weight painting was obviously a nightmare, because the suit is not supposed to bend. Also it was very frustrating because my character has a lot of different layers and e.g. if I wanted to paint the head I could not because of the glass, even if this one was hidden. Plus I would paint on the glass, I had to zoom in a lot to paint the head and that was just very uncomfortable and discouraging. So, how did I fix this? Make the bones visible Well first of all, I could not remember how to make the bones visible from every angle when you're creating the rig and is very simple, I found it here [ Xray joints ]. Only rig what bends So instead of rigging everything, I took the suit and the helmet out of the Arl group and parented to the spine bone. So much easierrrrr to weight paint. I left the sleeves because they have a rubbery material and I wan...

BSA227 - Week 13 | Eye colour tests with Arl + Eye controller

Image
When texturing the glass bubble it was all black at first and I didn't understand why it wasn't working because the Transmission was 1.0. But I found this information online, it was only the Opaque option. Glass/transparent material in Maya I used the eye color maker from the resources to make some options. These were some: In the original concept art Arl has black eyes but it didn't have the same effect in 3D, I think it looks more creepy than cute. I think I like the dark brown ones and they look still pretty dark from the distance. I made eye controls following this tutorial (it's in other language but it's very easy to follow).

BSA227 - Update | Filming + Model + Problems with Mudbox

Image
FILMING We booked a day to film in the Otepuni gardens. The paperwork for the permission was a bit difficult to do but I was glad that it worked out and we did not have to pay any fees like we thought. The filming went good, we had some trouble at first with the camera settings but Rebekka could manage. Unfortunately, we did not have enough time to film everything we wanted, we still have to shoot the scene with the can and the Arl leaving. MODEL + MUDBOX NIGHTMARE For the past weeks I've been modelling Arl and has taken more time than I thought. I also added materials, I changed the colour palette slightly adding copper accents. I was very "worried" about the head, that's why I left last but it wasn't that bad! I had to start again twice but it was worth it because now I have a better understanding of head topology. I highly recommend having references open, I was comparing and analyzing them all the time. The fact that there's no nose also helped....

BSA227 - Week 9 | Nuke: Green Screen

Image
Import all the files with Read nodes.  Add a Keylight node and on the right side click the color pipe and select the green screen. Change the view to Screen Matte to see the result in grayscale values. This way is easier to control the amount of green without altering the character too much. Add a Roto node and mask the character. Merge the mask and the background with a Merge node. Change the View to Final Result . The background is too big for the screen format. To fix this add a Reformat node. Lastly, I corrected the colour of the character to make her fit better in the background's lighting.

BSA227 - Week 8 | Introduction to Nuke

Image
So Nuke is very different to After Effects because the workflow is with nodes instead of layers. To add a node press Tab and search for the name of the node. To import a file use a Read node. Use a Merge node to connect the file to the viewer node. The Merge node has two components, A and B. Use the B for backgrounds. Connect the second component with the fire file. Use a Transform node to scale it and place it somewhere else. Select a node and press D to make that node invisible (like visibility with layers). Use a Roto node to mask the column. All the options of the different nodes appear on the right side of the screen. Inverse the mask so the column is visible. If you want multiple masks, connect the node to the previous Roto . Connect a Grade node to the smoke file to make it blend better with the footage.

BSA227 - Week 8 | Saber

Image
Create a black Solid and add a Saber effect.   This effect does not have to be necessarily only a saber, under the Select Tab there are a lot of options (fire, lightning,  cool light effects) that can be used. So the next thing is create a form, I created a circle. Under Customize Type change the Core Type to Layer Masks to attach the effect to the form. Then I deleted the circle and create a different form with the Pen Tool . Duplicate the Saber effect and change the color on the second one. Then edit the End and Start Points to make it half and half. And then add keyframes so that the meet in the middle. This works with text too. Change the Core Type to Text Layer instead and then select the text layer (the 2nd layer in this case). To blend it with the background change the Composite Settings to Add and the Alpha Mode to Mask Glow . The last thing we did is to make it look like an hologram. So create a square around the text and attac...

BSA227 - Week 7 | Blowing up someone with a lightning

Image
After importing the footage make the duration of the clip a little bit longer in the Composition Settings . Duplicate Run and rename it. This is going to be the background layer. Freeze the frame where the character is not in the shot. Duplicate Run again  and rename it. This is going to be for the feet. Freeze a frame where the character will be hit by the lightning.  Right click on the layer > Time > Freeze frame Mask around the feet with the Pen Tool . Duplicate Run again and rename it. It's gonna be for the character's explosion. To blend the edges of the feet a little bit better increase the Mask Feather . Drag the Pop layer to the top and mask the character's body.  Make a Composition out of Pop: Right click on the layer > Pre-Compose Add a Pixel Polly effect. This is very customizable as well so to make the pieces smaller and fall down change the Randomness and the Spreading . Back ...