Gaming Art - Week 6 | UI Elements in Unity
In today's class we made a basic main menu in Unity. It's easier if the 2D perspective is activated.
The first thing is creating a Canvas. Inside the Canvas create a Text (Create > UI > Canvas or Text).

To use other Typos you have to copy and paste them in the Assets Folder to access it. Then you can edit the size, colour, etc. as usual.

Create a button (under UI). Under the Button you can find the Text and edit it. You can also change the button's form with the source option.

You can change the background colour through the Main Camera.

Import the UI Elements in the Assets Folder. You can even use the Photoshop file for this, which is useful in case you want to edit it directly, so every change is automatically saved in Unity as well.
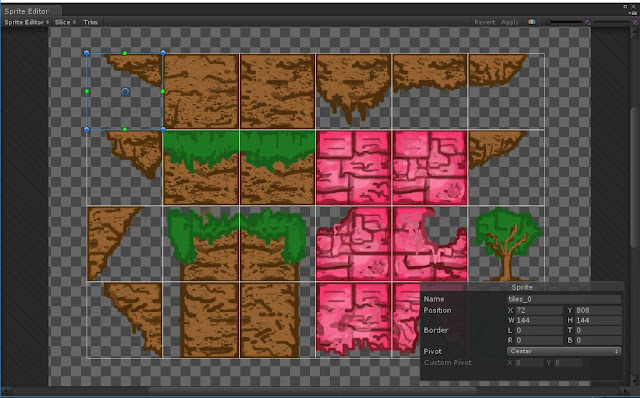
Then cut the elements with the Sprite Editor.

Add an Image (under UI) for the title. To maintain the original size click the Native Size button in the Inspector.

The main menu should stay in a separate scene. So for the actual level create a new scene and build whatever.

To activate the buttons and make them work we need a bit of code. So create a new C# Script.

I added some more buttons. Through the start button the first level will load. The help button (we did not implement that one, but it works the same way) opens the options or help menu and the Quit button exits the game.

This is what the code looks like. We need one method per Button which will be applied to each button in the Inspector. By clicking the button, attach the script, drag and drop the button object in the source and under the methods select MainMenu > and the method that corresponds to that button, e.g. NewGame(), which will load the first scene.

Under File > Build Settings you have to add every scene first, so that the Scene Manager recognizes the existing scenes in the game.

At the end we build the game so that we could test the Quit option.
The first thing is creating a Canvas. Inside the Canvas create a Text (Create > UI > Canvas or Text).

To use other Typos you have to copy and paste them in the Assets Folder to access it. Then you can edit the size, colour, etc. as usual.

Create a button (under UI). Under the Button you can find the Text and edit it. You can also change the button's form with the source option.

You can change the background colour through the Main Camera.

Import the UI Elements in the Assets Folder. You can even use the Photoshop file for this, which is useful in case you want to edit it directly, so every change is automatically saved in Unity as well.
Then cut the elements with the Sprite Editor.

Add an Image (under UI) for the title. To maintain the original size click the Native Size button in the Inspector.

The main menu should stay in a separate scene. So for the actual level create a new scene and build whatever.

To activate the buttons and make them work we need a bit of code. So create a new C# Script.

I added some more buttons. Through the start button the first level will load. The help button (we did not implement that one, but it works the same way) opens the options or help menu and the Quit button exits the game.

This is what the code looks like. We need one method per Button which will be applied to each button in the Inspector. By clicking the button, attach the script, drag and drop the button object in the source and under the methods select MainMenu > and the method that corresponds to that button, e.g. NewGame(), which will load the first scene.

Under File > Build Settings you have to add every scene first, so that the Scene Manager recognizes the existing scenes in the game.

At the end we build the game so that we could test the Quit option.

Comments
Post a Comment