Posts

Showing posts from August, 2018

BSA227 - Week 7 | Blowing up someone with a lightning

Image
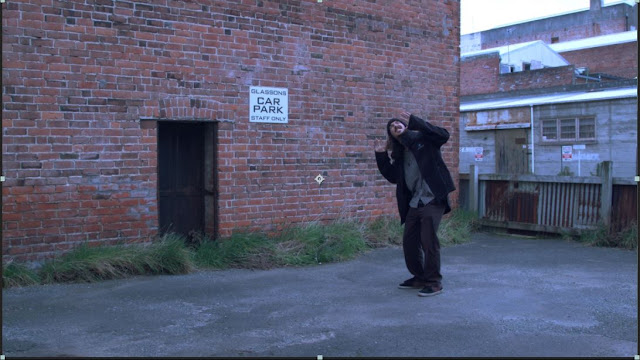
After importing the footage make the duration of the clip a little bit longer in the Composition Settings . Duplicate Run and rename it. This is going to be the background layer. Freeze the frame where the character is not in the shot. Duplicate Run again  and rename it. This is going to be for the feet. Freeze a frame where the character will be hit by the lightning.  Right click on the layer > Time > Freeze frame Mask around the feet with the Pen Tool . Duplicate Run again and rename it. It's gonna be for the character's explosion. To blend the edges of the feet a little bit better increase the Mask Feather . Drag the Pop layer to the top and mask the character's body.  Make a Composition out of Pop: Right click on the layer > Pre-Compose Add a Pixel Polly effect. This is very customizable as well so to make the pieces smaller and fall down change the Randomness and the Spreading . Back to

BSA228 - Week 7 | Building assets: hazards, enemies and collectables + Building the astronaut

Image
This week I started building assets and started the astronaut. ASSETS The asteroids were really easy to make. I started with a sphere and decreased a looot the subdivisions until it was almost a cube and then I just pulled vertices and edges here and there, very randomly. For the enemies I started with a cylinder and decreased the subdivisions as well. For the lights and spikes I used Duplicate Special , so handy! Then I made a low poly crown (sorta) for the Queen of the aliens. For the comet I started with a sphere and cubes where I pulled one corner back . Then I duplicated it a lot of times until I got this. I'm posting it in 3 mode as well because it looks pretty funny. ASTRONAUT So even though everything is low poly the astronaut took a little bit longer and I did not really know how to go because I was thinking how the topology is going to affect the rigging afterwards because is so low poly. But I'll see in the next class when I get

Gaming Art - Week 7 | Mudbox + LOD in Maya and Unity

Image
MUDBOX The first thing is import the the objects in Maya, in this case a low poly bridge. Delete the history and attributes and send it to Mudbox ( File > Send to Mudbox > Send as new scene ). Under the Select/Move Tools Tab click on the Scale tool and scale it 10x10x10, because the scale is different between Mudbox and Maya. Increase the Subdivision levels up to 5 with Shift+D . Create a new sculpt layer. Now we can start carving. Select the sculpt tool and some stamp, increase the Strength to 100 and make the size pretty small. Activate Invert Function and start carving the stones. After that I added a granulated texture with a very big brush and weak strength. Then import a rock texture for the stones and set it as a stencil or stamp. Under the Paint Tools tab select the Projection and start painting. Oh, and do this in a new diffuse Paint Layer . In a new Specular Paint Layer paint with the Paint Brush black where it is not shiny and whit

Gaming Art - Week 7 | Tilemaps in Unity

Image
Today's class was pretty cool, even though it was a 2D technique: how to create tilemaps in Unity. And it really is easy, I was impressed. So the first thing to do is create the tiles in Photoshop. It is important to show the grid and rulers and to have the units in Pixels, so that we know exactly how big the squares and tiles are. Also it is better if we do not leave an offset between tiles and border of canvas because then we have to specify the offset in the Sprite Editor (which is not difficult but you can spare time). Then in the Sprite Editor instead of Automatic select Slice > Grid by Cell Size. We knew that the Pixel Size was (144px) and the offset was 72px. Then apply. Create > 2D Obejct > Tilemap. It will be under the created Grid.  Open Window > Tile Palette. Now we can create palettes with different tiles to paint with. Create New Palette > save it in a new Folder "Palettes". Then select the tiles you need for that palette, like